ListView sub-item bounds

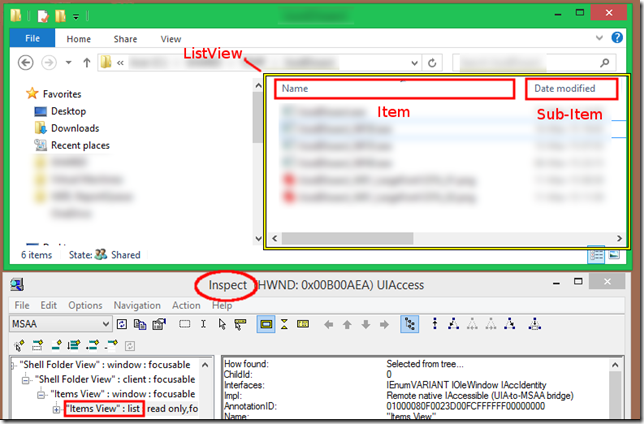
The ListView is a Common Control that has been shipping with Windows for a very long time, in both the Window NT and 9x flavours. Indeed, Windows (File) Explorer uses a ListView control, which you can see by using the Inspect tool from the Windows SDK:

image

Because the ListView control has been shipping with Windows for such a long time, deploying programs that use it are simplified, and so, desirable. However, using it for anything but it’s original use cases will have you run into some (perhaps unexpected) problems. 

For example, if you want a lightweight, read-only grid control, your well within it’s capabilities by setting it to “report-view”, adding columns, switching on grid lines, etc. However, if you want to take it that one step further and allow in-place editing of each “cell”, your now outside it’s capabilities.

It’s true that the ListView is capable of editing the leftmost “cell” otherwise known as the “Item”. Those who are familiar with using Windows (File) Explorer should well know this – rename file. But in-place editing of the remaining “cells”, otherwise known as sub-items, is not one of the ListView’s built-in capabilities.

In theory, however,  all you need is some “hit” testing an editing control (such as TextBox), some positioning and event handling code and your set – familiar last words, I’m sure.

Note: What I’m doing here is obviously an educational exercise. I like doing stuff like this myself every so often so I can better understand the problem space, the terminology, the tools, etc. Downloading or Copying and pasting code is not the point of the exercise. It’s also unfortunate that had to be said…

So here is the first thing I ran into, and will be the primary focus of this post:

image

In the shot above, I’m in the process of overlaying a text box over the second item’s sub-item. Or in other words, the second cell of the “Unformatted String” item. The ListView has been set to Report-view,  Header’s set to None, Gridlines enabled, etc.  The ListView has also been inset on the Form to accentuate the problem, at least to those that have been made aware of the scenario.

The Textbox has no boarders and a default (white) background. It is not a child of, or contained by the ListView, so you can see that the Textbox’s white background extends past the right bound of the ListView and, indeed, overlays the form’s grey background.  The bounds of the Textbox were set from the sub-item’s bounds. Essentially:

textBox1.Bounds = subItem.Bounds;

After examining the Form’s design in Visual Studio, it becomes apparent that my ListView control’s bounds are smaller than the sum of the Column widths that I set (at design-time). After some quiet reflection, it becomes apparent that because the ListView is designed to be scrollable, both horizontally and vertically, it needs to allow column widths whose sum is larger than the ListView’s bounds – so it can scroll. However, because of this, when I ask for the bounds of a sub-item, it is not necessarily returning what I presumed would be it’s on-screen width.

Specifically, with scrollbars disabled, it renders what it can, but it does not auto-sized the column width to remain within the bounds of the ListView. True, you can ask the ListView to auto-size all or specific columns to be the width of the contents of the header or widest (sub)item. But it does not take the scrollable state, or the bounds of the control into consideration. At least, not that I’ve seen or read about.

So let’s do some tinkering, er, investigation. For this, I’m going to use Visual Studio 2013 Express Desktop in C#, .NET 4.51, Winforms and the Inspect tool.

Investigating

First step was to get the details of the various bounds being used, so I set a breakpoint and some watches as seen here:

image

At line 67, for diagnostic purposes, I get the bounds of the second item, which has a vertical offset and a height of 20 pixels, and a width of 455 pixels.

At line 68, I set the bounds of the Textbox to those of the sub-item. So the Left is 120 pixels in, the top is 20 pixels down, the width is 335 pixels, and height 16 pixels.

Ignoring the discrepancy of the height for the moment (16 instead of 20 pixels), the width happens to be the width I set for the Column at Design time, and not the (presumed) width I see on-screen. However, upon using the SDK’s “inspect” utility, it told (and showed) me that the sub-item’s width was actually within the bounds of the ListView, with a width of 264 pixels (485 – 221), and not the 335 we get in our code:
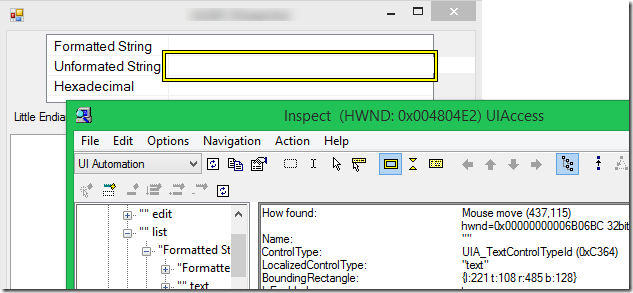
image

This result actually lead me into a fruitless debug session into the Winforms framework – though I’ll probably write that up in a separate post. After realising that the framework code was fine, I then realised that Inspect defaults to “UI Automation” mode. After switching to “MSAA” mode – Aha !

OK, so the most obvious thing one notices when switching between the modes is that the layout of the “objects” in the tree on the left and the properties on the right are quite different. Specifically, we do not have ListView sub-item objects in the tree when in MSAA mode, and instead of a “Bounding Rectangle” property there is a “Location” property. On the other hand, we do have ListView item objects are in both modes, and that is where we can see differences in the bounds between the two modes.

Here are the two modes, side by side (merged the two screen grabs):

image

From this, we see the ListView item has a reported width of 455 pixels in MSAA mode, and 384 pixels in UIA mode (485 – 101). So clearly MSAA mode provides information that is “less cooked”, and in this case, closer to the values returned via traditional (non-Accessibility) API routines such as LVM_GETSUBITEMRECT.

Next time, I’ll investigate this sub-item issue on other Windows platforms such as Windows XP, 2000 and 98SE, just to see whether this behaviour has changed. Indeed I’m also interested to continue with Windows 8.1 and how .NET and\or Winforms “enables” Version 6\visual styles.
Posted in Debugging, Programming, Troubleshooting | Comments Off on ListView sub-item bounds

WinDBG, DLL ordinal exports and IDA proc module

There are a few DLLs around that deliberately export by ordinal only rather than by name and ordinal – ordinal-only versus named exports, respectively. For example the MFC40* and MFC42* family of DLLs are common ones. In the picture below, we can see that Dependency Walker shows that MFC40.DLL has both types of exports. The ordinal-only-exports are shown with the “0#” icon and “N/A” for both the “Hint” and “Function” values:

Depends_MFC40_DLL_Ords

Now imagine that you need to use the entry-point information from an ordinal-export. For example, debugging an IDA Pro processor module. Is there a WinDBG expression we can use without having to copy and paste, or type in the address ?

Google did not bring up much in the way of help with regards to using ordinal-exports in WinDBG, and the WinDBG help file only mentioned “Ordinals” in relation to Process and System identifiers, and the wmitrace extension . So I thought I should blog it.

WinDBG Ordinal syntax

Quite simply, the syntax is “Ordinal”, then it’s  number in decimal appended on the end. So Ordinal #1 in the PC.DLL module is “pc!Ordinal1“. In the case of MFC40.DLL shown in the picture above, ordinal #256 (decimal) would be “mfc40!Ordinal256“.

At this stage, it appears that only the MASM expression evaluator understands the ordinal syntax, as shown above. Moreover it only seems to work if you don’t have symbols loaded for the module – specifically, when I had symbols loaded for MFC42.DLL, all of the ordinal-exports became named symbols. In other words, if you do have symbols, then your probably not going to need the ordinal syntax in the first place, and so WinDBG appears to remove any such aliasing on the symbols.

For a bit of fun, I even went back to WinDBG 5.1 (circa June 2000) and the ordinal expression also works there:

WinDBG 5.1 running on Windows 2000 VM – checkout the title bar.

WinDBG_51_OrdExpr


Examining an IDA Pro processor module

An IDA Pro processor module only has one export, ordinal #1. However, whilst IDA uses a DLL file for it’s plugin-modules, the way it is used is somewhat peculiar. Indeed they have changed the file extension from “DLL” to “W32” on Windows 32-bit systems. Instead of the DLL’s export entry-point being a pointer to code, it is actually a pointer to a “processor_t” data structure. To see it, I do this (obviously, after I have built and loaded a module with the appropriate IDA Pro symbols into the debugging session):

dt processor_t @@masm(pc!Ordinal1)

0:003> dt processor_t @@masm(pc!Ordinal1)
nosey!processor_t
+0x000 version : 0n76
+0x004 id : 0n0
+0x008 flag : 0x41423
..
+0x0d4 is_align_insn : 0x130109c0 int pc!Ordinal3+0
+0x0d8 mvm : (null)
+0x0dc high_fixup_bits : 0n0

Notice how I use the @@masm() operator to force the evaluation of the “pc!Ordinal1” symbol rather than having to manually type in it’s address. Doing otherwise, dt would try to interpret the token as a field name of the “processor_t” structure rather than the address of a symbol.

You could also have used the C++ expression evaluator. However, you still need to use the MASM evaluator for the ordinal. So with the default MASM evaluator, I escape to the C++ evaluator by using the “??” command. Within the C++ expression, I escape back to the MASM evaluator by using “@@()“.  Casting the result of the “@@()” expression as a pointer to a “processor_t” structure, then we get this:

?? (processor_t*) @@(pc!Ordinal1)

 0:003> ?? (processor_t*) @@(pc!Ordinal1)
nosey!processor_t
+0x000 version : 0n76
+0x004 id : 0n0
+0x008 flag : 0x41423
..
+0x0d4 is_align_insn : 0x130109c0 int pc!Ordinal3+0
+0x0d8 mvm : (null)
+0x0dc high_fixup_bits : 0n0

Posted in WinDbg | Comments Off on WinDBG, DLL ordinal exports and IDA proc module

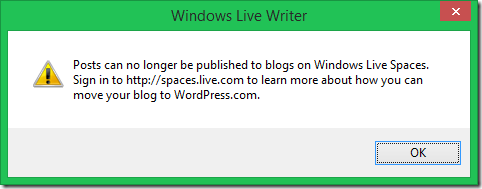
Windows Live Writer message: Posts can no longer be published to Windows Live Spaces.

I suppose it is appropriate that the first post I make to my blog since so many years is to do with Windows Live Writer 2012, version 16.4.3528.331. Whenever I tried to publish or post draft to the blog WLW would throw up this message:

WLW_SpacesMessage

Everything else seemed to work fine, just couldn’t publish via WLW. The “Windows Live Writer.log” file did not have anything obvious to help, so I ran Process Monitor and saw this:

WLW_SpacesMessage_ProcMon

Changing the “IsSpacesBlog” key to Zero removed the problem:

HKEY_CURRENT_USER\Software\Microsoft\Windows Live\Writer\Weblogs\
{insert your site GUID}
\IsSpacesBlog

WLW_SpacesMsg_RegIsSpacesBlogSet

WLW_SpacesMsg_RegIsSpacesBlogReset

Posted in Troubleshooting | Comments Off on Windows Live Writer message: Posts can no longer be published to Windows Live Spaces.

Mounting 2.5 inch (Notebook) Hard Disk in a DELL Optiplex 755 MiniTower case

DELL Optiplex systems are typically bought by Corporations for use by employees. My system is an Optiplex 755 MiniTower. Note that the 755 is also available as a slim line Desktop, which is not described here.

Upon first inspection, DELL have a rather good design where they use a plastic cradle to mount a 3.5 inch Hard Disk without using any screws. This is achieved by using rubber mounts that have a metal stud that sits within the Hard Disk’s screw holes. Here is a shot of the cradle.

Obviously in order to mount a 2.5 inch drive within a 3.5 inch cradle, I’ll need an adapter, and here is a couple of shots of the adapter I managed to scrounge up. The adapter mounts the 2.5 inch drive via it’s four base mounts.

However things start to get crappy from here. The problem is that DELL have designed the cradle to mount the 3.5 inch drive’s upside down. That appears to be because the cradle’s handle is offset to the wrong side, and rather than redesign the cradle, DELL’s solution, at least in this batch, was to mount the drive upside down.

That aside, this design also means that we have a problem with the adapted 2.5 inch drive. The adapter centres the 2.5 inch within the 3.5 inch form factor, and that means that the drives SATA power and data connectors are effectively offset closer towards the centre of the drive, right where the cradle’s handle is. PITA.

My “solution” to this was to simply cut away a portion of the cradle’s handle.

The next problem was with the stud within the rubber mounts. These turned out to be too large in diameter for the screw holes in my adapter. So without a drill handy, I had to remove the first two mounts and then tape the adapter frame to the cradle. As it turned out, this also solved another problem. If you look at this next shot, you’ll see that the spacing between the SATA power connectors have been “optimised”  for 3.5 devices. Which means in my case that there is not quite enough length if I had been able to use the first two mounting studs. By not using the mounting studs, I was able to move the end upwards (in the shot), just giving me enough of the cable to connect the SATA power cables on the 2.5 inch drive.

The last mounting problem was having to swap the SATA data cables from the original 3.5 inch drive (upper) with the new cable I bought for the 2.5 inch. I naively bought a standard 0.5 meter cable, which given the case arrangement is not quite long enough. The original (longer) cable is the cyan (light-blue) coloured cable, and the new 0.5 meter cable is light orange. Obviously that meant that I also needed to swap the other end of the SATA data cable on the motherboard, as shown here, in it’s final configuration. The dark orange SATA cable is for the DVD drive.

The last part of the installation is the BIOS setup. Upon powering up the system, I bang away on the “F2” key until the DELL’s BIOS opens up, then I traverse down on the left side to the SATA 2 settings, changing the enabled state to “ON”, as shown here.

Posted in Computers and Internet | Comments Off on Mounting 2.5 inch (Notebook) Hard Disk in a DELL Optiplex 755 MiniTower case

Opening a Western Digital Elements external drive case

A lot of external drive cases these days don’t use screws to hold them together. Instead they use some kind of retaining clips. So the main part of the opening procedure is to know the type and where the clips are.

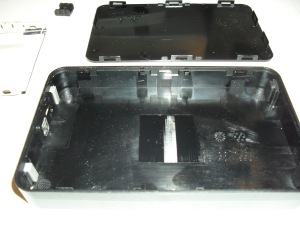
Here is a shot of the Western Digital Elements external drive case. You’ll see there are nine retaining clips: three on each of the long sides, two on one of the short sides and one more on the last short side – the USB port is located where the second clip would have been.


Next is using the right tool. For this type of case you need a strong thin blade. In this video, I use a pen knife. We don’t use the knife to cut anything, but rather levering it between the mating sides of the each of the clips. I work my around the case, one by one, trying to raise (separate) that part of the case as I unclip. I use a small jewelers screwdriver to aid the process.


Here are some additional shots of the innards.

PS: I cheated, of course. I’d already removed the internal 2.5 inch 500GB drive before I recorded the Video. If your really observant, you’ll notice me hesitating as I’m about to remove the lid, actually the base of the case, opting to rotate it instead.

Posted in Computers and Internet | Comments Off on Opening a Western Digital Elements external drive case

The symbols you have when you don’t have symbols

I had a problem the other day where I could not set any breakpoints on code which, at first glance, appeared to have the appropriate debugging symbols. It was especially annoying when I recompiled the code, yet could still not set any breakpoints on the code I just compiled. I’ll first show how I confirmed the cause of the problem, then I’ll show this can be reproduced.

The cause is actually quite simple – it really didn’t have the required symbols, despite the fact that the PDB matched the DLL in question. For example, here’s what my reproduced sample, PdbTest01, does during a debugging session in Visual Studio 2005sp1/vista (an executable rather than a DLL, but the problem manifests the same way):


Here’s what happens using WinDBG:

Yet the symbols also appear to be loaded:

0:000> lmm pdbtest01
start    end        module name
00400000 00405000   PdbTest01   (private pdb symbols)  d:\symbols\PdbTest01.pdb\...\PdbTest01.pdb

Investigating

What we need is a tool that lets us examine what’s actually in the PDB. Thankfully, a free tool for this already exists – the Debugging Tools for Windows includes a utility named DBH, and it’s elines command can enumerate all of the source-code lines contained within the symbols file. It’s a command-line tool, and here is a portion of it’s output when run against the appropriate PDB:

C:\Users\Richard>dbh D:\DEVELOP\Tinkering\release\PdbTest01.pdb

PdbTest01 [1000000]: elines

OBJ:.\release\PdbTest01_Lib.obj
   d:\develop\tinkering\pdbtest01_lib\pdbtest01_lib.cpp
      24 25 26
...

Now I suppose I should first explain that the executable being examined here (PdbTest01.exe) is a Windows Console-mode program, and it’s built from a ‘main’ source file (PdbTest01.cpp), and a static Library (PdbTest01_Lib.LIB). See the next section for the details.

Clearly from the output of the elines command shown above, there’s only one (user-supplied) object file that contains (debugging) source lines, and this object file came from the static Library. That is, you can see that there is a pdbTest01_Lib.obj, which was built from a pdbtest01_lib.cpp source file, and we have lines 24, 25 and 26 from that cpp file. We do not have any source lines from the PdbTest01.cpp (no _Lib in the name). That’s the clear indicator. Simple, eh ?

NOTE: Although I’m using version 6.10.3.233 of the Debugging Tools for Windows, be aware that this version has a C-String termination issue related to the Symbols API’s. As the system I’m writing this up on is not one that I would normally use in production, I’m not too concerned about this problem, which typically manifests itself as ‘garbled’ stack traces in third-party tools such as Process Explorer, etc. One of the reasons for doing this version, though, is so that I can use the updated documentation that shipped with this version.


Reproducing

I first stumbled across this odd situation whilst working on some old source code using Microsoft Visual Studio 6.0. But for the reproduction, here, I’m going to use Visual Studio 2005sp1/vista.

The trick here is that we need to produce at least two object files, but only one of those, the static library, will be built with symbols. The object file for the main executable is configured not to produce symbols (debug Info).

Add two C++ projects to a solution: a Windows Console app and a static library.

The static library consists of two files (well four if you count the pre-compiled header stuff): a library header and a cpp file. Here is the source for the header file, PdbTest01_Lib.h (single line):

int Func1();

and here’s the source for the static library’s cpp file, PdbTest01_Lib.cpp:

#include "stdafx.h"
#include "PdbTest01_Lib.h"

int Func1()
{
    return 1;
}

Now here’s the source for the main executable, PdbTest.cpp:

// PdbTest01.cpp : Defines the entry point for the console application.
//

#include "stdafx.h"
#include <conio.h>
#include "..\PdbTest01_Lib\PdbTest01_Lib.h"

int _tmain(int argc, _TCHAR* argv[])
{
    int n = Func1();
    printf("Func1(): %d\n", n);

    getchar();
    return 0;
}

For the main executable’s project, I also check that it has a dependency upon the static library:


Finally, edit the main executable’s project properties. Under C/C++, General, set the Debug Information Format to ‘Disabled’:

That’s pretty much it.

Here’s the output of a Rebuild of the main executable:

1>------ Rebuild All started: Project: PdbTest01_Lib, Configuration: Release Win32 ------
1>Deleting intermediate and output files for project 'PdbTest01_Lib', configuration 'Release|Win32'
1>Compiling...
1>stdafx.cpp
1>Compiling...
1>PdbTest01_Lib.cpp
1>Creating library...
1>Build log was saved at "file://d:\DEVELOP\Tinkering\PdbTest01_Lib\Release\BuildLog.htm"
1>PdbTest01_Lib - 0 error(s), 0 warning(s)
2>------ Rebuild All started: Project: PdbTest01, Configuration: Release Win32 ------
2>Deleting intermediate and output files for project 'PdbTest01', configuration 'Release|Win32'
2>Compiling...
2>stdafx.cpp
2>Compiling...
2>PdbTest01.cpp
2>Linking...
2>Generating code
2>Finished generating code
2>Embedding manifest...
2>Build log was saved at "file://d:\DEVELOP\Tinkering\PdbTest01\Release\BuildLog.htm"
2>PdbTest01 - 0 error(s), 0 warning(s)
========== Rebuild All: 2 succeeded, 0 failed, 0 skipped ==========
Posted in Debugging, Visual Studio, WinDbg | Comments Off on The symbols you have when you don’t have symbols

Tinkering with STL #2 – Functors and examining the compiler output

In Tinkering with STL #1, I briefly described what the C++ Standard Template Library’s Functors and Binders were for. Today, I’m going to show what the compiler does when faced with this with this type of source code.

All code show here will be compiled using the Professional version of Visual Studio 2005 with Service Pack 1 applied. Compiler version 14.00.50727.762.

1a. Static parameters passed to a Functor

In the following code snippet, the integers a and b are statically set to 2 and 1, respectively:

  // 1a. Functor.
  int a=2, b=1;
  if ( std::greater<int>()(a, b) )
    cout << "a is Greater then b." << endl;

So at compile-time, the compiler should be able able to deduce that the condition (whether a is greater than b) is not going to change at runtime, and hopefully eliminate any conditional checks.

Let’s think about that for a minute. The code appears to be making a call to a greater function, and yet I’m expecting the compiler to reason about this call ; that greater is functional – it’s result is conditional only upon it’s parameters, and that if it’s parameters are static, the result will not change – ever. Of course that is not what is actually happening with this templated code – it’s “expanded” and “inlined” before it’s fully compiled. But it’s an interesting concept, none-the-less. I suppose the fact that greater lives in a header file named functional should alert users about this. But that assumes your users are aware of this concept to begin with…

Here is the resulting assembly code, as seen within the Disassembly view in VS2005:

  // 1a. Functor.
  int a=2, b=1;
  if ( std::greater()(a, b) )
    cout << "a is Greater then b." << endl;
1.  00401007  mov         eax,dword ptr [__imp_std::endl (40204Ch)] 
2.  0040100C  push        esi  
3.  0040100D  push        eax  
4.  0040100E  push        ecx  
5.  0040100F  mov         ecx,dword ptr [__imp_std::cout (402044h)] 
6.  00401015  push        offset string "a is Greater then b." (402134h) 
7.  0040101A  push        ecx  
8.  0040101B  call        std::operator<< > (401210h) 
9.  00401020  add         esp,0Ch 
10. 00401023  mov         ecx,eax 
11. 00401025  call        dword ptr [__imp_std::basic_ostream >::operator<< (402048h)] 

Wonderful. No conditional code, at all. Let’s step through the assembly code just this once, so you can get a feel for what it’s doing. (I added the line numbers above).

  1. Starting at code address 0x401007, we move the address of the endl function into the eax register. How do I know that this symbol is a pointer to code and not data ?.  I cheated ; I saw how it used later in the program. Similarly, you can use Intellisense or the Code Definition Window within Visual Studio, or given that it’s an import, you can use a tool like Dependency Viewer and check the DLL’s exports.
  2. The esi register is pushed onto the stack. It’s not obvious at this point why it is doing this. But after a bit of sleuthing, you soon realise that it’s simply saving the register ; this code just happens to be hard up against the main entry point. Later, just before main exits, the original contents of this esi register is popped back off the stack.
  3. This pushes the address of endl (that we got in step 1) onto the stack in preparation for the (second) call to operator<< in step 12 below.
  4. The contents of the ecx register is pushed onto the stack. This is just saving the register so it can be used in the next step.
  5. The ecx register is loaded with the address of the global cout output stream object.
  6. The address of the string we’re going to print out on the console is pushed onto the stack. Thankfully, the debugger shows us the string.
  7. The cout object’s address, that we got in step 5, is now pushed onto the stack, ready for the call in the next step.
  8. We call operator<<. The parameters it needs are on the stack, in reverse order. That is the output stream (step 7), and the string (step 6).
  9. We manually fix-up the stack pointer rather than popping off the parameters passed in the previous call (step 8).
  10. We move a copy of the cout object’s address in the ecx register.
  11. Finally, we call operator<< again. But curiously, this time it’s an indirect call into msvcp80.dll. This program was compiled to use the standard libraries as DLLs.

1b. Variable parameters passed to a Functor

Next, I add a proper conditional by assigning the result of the rand function to b.

  // 1b. Functor.
  b = (rand() > RAND_MAX/2) ? 2 : 0;
  if ( std::greater<int>()(a, b) )
    cout << "a is Greater then b." << endl;

Here is the assembly code it produces:

  // 1b. Functor.
  b = (rand() > RAND_MAX/2) ? 2 : 0;
 1. 0040102B  mov         esi,dword ptr [__imp__rand (4020D0h)] 
 2. 00401031  call        esi  
 3. 00401033  xor         edx,edx 
 4. 00401035  cmp         eax,3FFFh 
 5. 0040103A  setle       dl   
 6. 0040103D  sub         edx,1 
 7. 00401040  and         edx,2 
  if ( std::greater()(a, b) )
 8. 00401043  cmp         edx,2 
 9. 00401046  jge         main+6Bh (40106Bh) 
    cout << "a is Greater then b." << endl;
10. 00401048  mov         eax,dword ptr [__imp_std::endl (402054h)] 
11. 0040104D  push        eax  
12. 0040104E  push        ecx  
13. 0040104F  mov         ecx,dword ptr [__imp_std::cout (40204Ch)] 
14. 00401055  push        offset string "a is Greater then b." (402134h) 
15. 0040105A  push        ecx  
16. 0040105B  call        std::operator<< > (401240h) 
17. 00401060  add         esp,0Ch 
18. 00401063  mov         ecx,eax 
19. 00401065  call        dword ptr [__imp_std::basic_ostream >::operator<< (402050h)]

Notice how the code from line 10 onwards is almost identical to earlier. Also notice how it uses some creative mathematics to set b (edx register) in lines 3 through to 7. It’s interesting enough, so I’ll step though it.

  1. moves the address of the rand function into the esi register.
  2. calls the rand function, indirectly, via esi.
  3. Zeroes the edx register.
  4. compares edx with 0x3fff – half of the maximum range that rand can return.
  5. Sets dl to one if the comparison in step 4 was less than or equal, and zero otherwise. dl is the lower 8-bits of the edx register.
  6. subtracts one from edx. If edx was zero, all bits become set (minus one).
  7. masks edx so that if any bits were set, only bit-1 remains. ie edx will contain the value two or zero.
  8. Now we finally get to the code from the greater Functor. edx is compared with two.
  9. If the result of the comparison is greater or equal, then it jumps over the cout code.

1c. Volatile parameter passed to a Functor

Finally, I was interested to see how the compiler behaved if I modified the first code snippet by using a parameter that’s been attributed with the volatile keyword.

  // 1c. Functor.
  volatile int v=1;
  if ( std::greater<int>()(a, (int)v) )
    cout << "a is Greater then v." << endl;

Here is the assembly code:

  // 1c. Functor.
  volatile int v=1;
 1. 0040106B  mov         dword ptr [esp+4],1 
  if ( std::greater()(a, (int)v) )
 2. 00401073  cmp         dword ptr [esp+4],2 
 3. 00401078  jge         main+9Dh (40109Dh) 
    cout << "a is Greater then v." << endl;
 4. 0040107A  mov         edx,dword ptr [__imp_std::endl (402054h)] 
 5. 00401080  mov         eax,dword ptr [__imp_std::cout (40204Ch)] 
 6. 00401085  push        edx  
 7. 00401086  push        ecx  
 8. 00401087  push        offset string "a is Greater then v." (40214Ch) 
 9. 0040108C  push        eax  
10. 0040108D  call        std::operator<< > (401240h) 
11. 00401092  add         esp,0Ch 
12. 00401095  mov         ecx,eax 
13. 00401097  call        dword ptr [__imp_std::basic_ostream >::operator<< (402050h)] 

Here we can see that v is given a real memory location, and that it does not optimise away the conditional.

Posted in Programming | Comments Off on Tinkering with STL #2 – Functors and examining the compiler output

Tinkering with STL #1 – creating a Predicate usable by find_if on a vector of string (C++)

This article has been completely rewritten since I first published it this morning, and posted my question on the Channel9 forums.

So yesterday I was tinkering around with the Standard Template Library (STL), trying to learn better ‘generic’ practices. But ended up getting stuck trying to solve a problem that occurs when you try to create a Predicate of string::compare() – the adaptors end up trying to create a reference of a reference, and the Compiler effectively says, no, go away.

OK, now some of you are probably saying: “Um, string ? Why are trying to use string::compare, just use the built-in operators. They have overloads”.

Well, as tends to happen with these types of things, it started innocently enough, but was rooted in a stupid mistake. I was converting a Microsoft (ptr_fun) sample which used a vector of char pointers. I thought, that was too old-school, and modified it to use std::string instead. The problem was that I forgot to rename the #include <cstring> to <string>, as was kindly pointed out to me by Sven. Thanks Sven.

This had the curious effect of not defining various parts of std::basic_string, such that Functors like equal_to failed to compile with complaints about operator==. Anyway, this lead to me trying to workaround the ‘missing’ operators by attempting to construct a suitable Predicate calling a member function, in this case string::compare().

Anyway, having been suitably embarrassed, I’m still curious about whether it can be done. Say, for example, because I need to use a Class that does define Iterators, but not a full compliment of operator overloads.

So let’s just start off with the definition of find_if, and then go into to some of the concepts behind what I’m trying to do. Having said that, I suppose I should point out that I’m not an Academic, so I’m probably going to mess up the terminology – but let’s give it a crack, anyway…

Here’s the basic definition of find_if:

template<class _InIt, class _Pr> inline
    _InIt find_if(_InIt _First, _InIt _Last, _Pr _Pred)
    { ...

find_if uses two generic classes: an Input Iterator and a Predicate. OK, an Iterator is pretty easy to understand, but what is a Predicate ?

Well in this context, it’s a Function that is passed an “item” (dereferenced Iterator) and returns a boolean result. So what find_if does is iterate over a range that you specify via the _First and _Last Input Iterators, and it continues until it either reaches the end of the range, or the Predicate _Pred returns true.

When I was first introduced to this algorithm, the predicate would usually be an ordinary C++ function call. That made it easy to understand, but from a practical point of view, a PITA to use.

Functors
At this point, if you’ve been lucky, you’ll have next been introduced to Functors. A Functor is basically an object that has defined (overloaded) the function operator – operator(). Because of this, a Functor (object) can basically be used as though you were calling an ordinary C++ function, with a twist:

  int a=2, b=1;
  if ( std::greater<int>()(a, b) )
    cout << "a is Greater than b." << endl;

Notice how in the if statement, I have to explicitly specify the brackets () before the parameter list. That’s in addition to explicitly specifying the “Type” Template parameter – <int> in this case.

Binding
The next thing is Binding. STL has two Binders: bind1st and bind2nd. Actually, these are helpers for binder1st and binder2nd, but you wouldn’t normally use these, directly.

A Binder basically allows you bind one of the parameters of a Function (or Functor), effectively changing a two parameter Function call into single parameter one: bind1st statically binds to the first parameter, and bind2nd with the second parameter.

  int c=2, d=1;
  std::binder1st<std::greater<int> > b1fn = bind1st(std::greater<int>(), c);
  if ( b1fn(d) )  // Equivalent to std::greater<int>()(c, d)
    cout << "c is Greater then d." << endl;

Bringing it all together
Now this is where I’m having trouble. In the following code, v1 is a vector of string, where each item is a word.

1. & 2. After I setup v1, I print out each word using a for loop and Iterators.

Next, I tried searching for the word “pearly” using various techniques.

3. Searching using find. Once I had the correct header included, it worked fine.

4. Using find_if and the equal_to Functor, adapted as a Predicate using bind2nd.

5. This is where I run into the reference to reference problem. I attempt to create a Predicate using mem_fun_ref and bind2nd., but I can’t get it to compile:

error C2529: ‘_Right’ : reference to reference is illegal C:\Program Files\Microsoft Visual Studio 8\VC\include\functional    312

From that point on, I tried breaking up the Predicate into it’s various concepts, in the hopes of trying to locate where it was failing.

6. The first thing was trying to get mem_fun_ref working using a parameterless function. Nothing too spectacular here, though I chose to include the explicit call (6.3).

7. Finally, I try to get mem_fun_ref working using a single-parametered function – compare. You’ll notice that I could not get the implicit call (7.2) to work. It fails with errors about not being able to deduce the template parameters – compare() has 6 overloads.

This therefore means that you must use explicit calls, as shown with 7.3 and 7.4.

All in all, it’s been an interesting exercise. My original hopes of producing more easily consumed source code has quickly evaporated with the realisation that we must use an explicit call – trying to create a Predicate from a member function worsens the consumability, quite considerably.

However, I’d still like to see whether the reference from reference issue can be solved, even though now it’s just an academic one.

The following code is for a console program:

#include <vector>
#include <algorithm>
#include <functional>
#include <string>
#include <iostream>

int main( )
{
  using namespace std;

  // 1. Setup and tinker with a vector of string.
  vector <std::string>            v1;
  vector <std::string>::iterator  Iter1, RIter;
  
  v1.push_back ( "Open" );
  v1.push_back ( "up" );
  v1.push_back ( "the" );
  v1.push_back ( "pearly" );
  v1.push_back ( "gates" );

  // 2. Let's start off by printing out the original sequence.
  cout << "Original sequence contains: " ;
  for ( Iter1 = v1.begin( ) ; Iter1 != v1.end( ) ; Iter1++ )
    cout << Iter1->c_str() << " ";
  cout << endl;

  ///////////////////////////////////////////////////////////////////////////
  // Now lets try various ways of searching for "pearly"
  ///////////////////////////////////////////////////////////////////////////
  
  const string kSRCH("pearly");
  
  // 3. use std::find
  RIter = std::find(v1.begin(), v1.end(), kSRCH );
  if ( RIter != v1.end() )
    cout << "using std::find ->" << *RIter << endl;

  // 4. use equal_to Functor for predicate.
  RIter = find_if( v1.begin(), v1.end(), 
    bind2nd ( equal_to<string>(), kSRCH )
    );  
  if ( RIter != v1.end() )
    cout << "using std::find_if and equal_to Functor ->" << *RIter << endl;

  // 5. Now assume the object (std::string) doesn't have the appropriate operator
  // overloads, but does have a compare() member. DOES NOT COMPILE !.
  RIter = find_if( v1.begin(), v1.end(), 
    bind2nd (mem_fun_ref<int, string, const string&>(&string::compare), string("pearly") )
    );  
  if ( RIter != v1.end() )
    cout << "using std::find_if and mem_func_ref ->" << *RIter << endl;
  
  // 6. OK, the above fails. So lets break the above predicate down, and see
  //    what we can get to compile. Well start with a parameterless member
  //    function (method) call. string::size().
  size_t z = v1[0].size();  // 6.1 Simulate an iteration, where an item is passed in.
  z = mem_fun_ref(&string::size)(v1[0]);                            // 6.2 implicit.
  z = mem_fun_ref<string::size_type, string>(&string::size)(v1[0]); // 6.3 explicit.

  // 7. Now let's try single parametered member function (method) function.
  //    string::compare().
  v1[0].compare(kSRCH);   // 7.1 Simulate a single iteration, again.
  mem_fun_ref(&string::compare)(v1[0], kSRCH); // 7.2 Doesn't compile: can't deduce template argument.
  mem_fun_ref<int, string, const string&>(&string::compare)(v1[0], "pearly" );  // 7.3 explicit 1
  mem_fun_ref<int, string, const string&>(&string::compare)(v1[0], kSRCH );     // 7.4 explicit 2

  // Done.
  getchar();
}

Just to add another data point, I tried compiling this under Ubuntu Linux 7.10 with GCC 4.1.3, and it fails as well (manually edited by me):

/usr/include/c++/4.1.3/bits/stl_function.h: In instantiation of 
  ‘std::binder2nd
  <
    std::const_mem_fun1_ref_t
    <
      int,
      std::basic_string
      <
        char,
        std::char_traits,
        std::allocator 
      >,
      const std::string&
    >
  >’:
  stl_mem_fun_ref_01.cpp:48: instantiated from here /usr/include/c++/4.1.3/bits/stl_function.h:435:
  error: forming reference to reference type ‘const std::string&’
  
/usr/include/c++/4.1.3/bits/stl_function.h: In function 
  ‘std::binder2nd<_Operation> std::bind2nd(const _Operation&, const _Tp&) 
  [
    with _Operation = std::const_mem_fun1_ref_t
    <
      int,
      std::basic_string
      <
        char,
        std::char_traits,
        std::allocator
      >,
      const std::string&
    >,
    _Tp = std::string
  ]’:
  stl_mem_fun_ref_01.cpp:48:  instantiated from here /usr/include/c++/4.1.3/bits/stl_function.h:455:
  error: no matching function for call to 
  ‘std::binder2nd
  <
    std::const_mem_fun1_ref_t
    <
      int,
      std::basic_string
      <
        char,
        std::char_traits,
        std::allocator
      >,
      const std::string&
    >
  >::binder2nd
  (
    const std::const_mem_fun1_ref_t
    <
      int,
      std::basic_string
      <
        char,
        std::char_traits,
        std::allocator
      >,
      const std::string&
    >&,
    const std::basic_string
    <
      char,
      std::char_traits,
      std::allocator
    >&
  )’
  /usr/include/c++/4.1.3/bits/stl_function.h:429:
  note: candidates are:
    std::binder2nd
    <
      std::const_mem_fun1_ref_t
      <
        int,
        std::basic_string
        <
          char,
          std::char_traits,
          std::allocator
        >,
        const std::string&
      >
    >::binder2nd
    (
      const std::binder2nd
      <
        std::const_mem_fun1_ref_t
        <
          int,
          std::basic_string
          <
            char,
            std::char_traits,
            std::allocator
          >,
          const std::string&
        >
      >&
    )
Posted in Programming | Comments Off on Tinkering with STL #1 – creating a Predicate usable by find_if on a vector of string (C++)

Copying Table Row text using Word VBA

Automating a Microsoft Word document can make sense in certain situations, though due to misuse, Microsoft has found it necessary to limit the operation of ‘Macros’ within Word, Excel and other Office component products. With that in mind, here is something you might be able to use or adapt to your needs.

In the picture at the left, you can see that I have three tables in a Word 2000 sp3 document. Each table has a varying number of columns, and each cell within each table has text, with exception of the last column. Instead, the cell at the end of each row has a CommandButton control.

Note that you need to show the Control Toolbox in order to place the CommandButtons, and to switch in and out of Design Mode.

Word’s Macro Language is a form of Visual Basic known as Visual Basic for Applications (VBA). But VBA doesn’t support what’s know as Control Arrays in Visual Basic proper. So instead, each of the CommandButtons shown above need to have their own click-event procedure. Indeed, you can’t even override the default procedure name. So rather than repeating, or hard-coding specifics into each of these procedures, it’s better to try and tease-out the functionality and place it into a ‘Generic’ procedure instead – and that’s what I’ve done here.

There are eight CommandButtons in this Document. But the functionality of retrieving the text from each cell within that row lives in a procedure that I named GetTableText. Thus the only thing in the CommandButton‘s click-event procedure is a call to GetTableText, and nothing else. This makes it easy to add new tables, rows and columns – new buttons simply need to call the GetTableText procedure, and it takes care of the rest.

Here’s the code:

Private Sub GetTableText()
  If Not Selection.Information(wdWithInTable) Then Exit Sub

  'Get Column and Row of cell containing the button that launched this event.
  Dim c As Long, r As Long
  c = CLng(Selection.Information(wdStartOfRangeColumnNumber))
  r = CLng(Selection.Information(wdStartOfRangeRowNumber))

  'Get all text from each cell in this row, bar the current cell.
  Dim cels As Cells, i As Long, s As String
  cels = Selection.Range.Tables(1).Rows(r).Cells
  For i = 1 To c - 1
    s = s & StripJunk(cels(i).Range.Text) & vbTab
  Next
  s = Left(s, Len(s) - 1)

  MsgBox("|" & s & "|")
End Sub

Private Function StripJunk(ByVal s As String)
  StripJunk = Trim(Replace(s, vbCr & Chr(7), ""))
End Function

Private Sub CommandButton1_Click()
  GetTableText()
End Sub

Private Sub CommandButton2_Click()
  GetTableText()
End Sub

Private Sub CommandButton3_Click()
  GetTableText()
End Sub

Private Sub CommandButton4_Click()
  GetTableText()
End Sub

Private Sub CommandButton5_Click()
  GetTableText()
End Sub

Private Sub CommandButton6_Click()
  GetTableText()
End Sub

Private Sub CommandButton7_Click()
  GetTableText()
End Sub

Private Sub CommandButton8_Click()
  GetTableText()
End Sub

So how does this work ?

If Macros are enabled, and your not in Design mode, when you click one of the CommandButtons, it first selects the button, then calls any event procedures associated with the control. In this case, we have procedures for the click event, and each of these simply call the GetTableText procedure – in this case a Sub (Subroutine).

The GetTableText subroutine takes advantage of the fact that the Selection object changes with the act of clicking the CommandButton. The first thing, though, is that it checks that the current Selection is indeed within a Table – the very first If statement.

The next block of code recovers the row and column information of the current table cell, which is the cell where the CommandButton has been placed.

The third block of code recovers all the cells of the appropriate row of the the current table. It then iterates through each of the cells up until the column where the CommandButton was, recovering their text, and building up a string in the s variable. The text from each cell is separated with a tab character, and the StripJunk function is used to remove extraneous characters that are part of Word’s housekeeping for table text.

Finally, the string is cleaned up (the last tab character stripped off), and the string is shown via a Message box. Additionally, I’ve also wrapped the Message box text with ‘|’ characters, just to ensure that I am indeed cleaning up the string:

In the picture above, note that I’ve modified the last table by adding an extra column to the right of the CommandButtons. I did this to highlight the fact that the GetTableText subroutine only copies the text from the cells to the left of the cell which contains the CommandButton. In the picture, I clicked the CommandButton in the second row of the last table. Notice that the Message box only shows the text from columns 1 through to 4, and nothing from columns 5 and 6.

Posted in Programming | Comments Off on Copying Table Row text using Word VBA

Using RUNAS.EXE to run as a limited user

In this increasingly security conscientious age, it’s common advice now that you should be running your day-to-day desktop as a limited-user. That is, you login using a user account which does not have any administrative privileges. Then, when necessary, you go through an elevation process.

With Windows Vista, this is now a built-in and fully integrated feature. Back on earlier versions of Windows, though (such as XP or 2000), whilst you can achieve a similar result, it’s not natural, and it is not a fully integrated experience.

But what if you want to operate in the opposite fashion – you want to stay logged in as a Administrative or Power User, but want to run certain programs at a lower privilege ?

Well you can, though it’s once again not a fully integrated experience. Some of you may be aware that when you right-click executables or their shortcuts, you get a RunAs menu option.

Unfortunately, this option filters out the lower privileged users. So it’s not of any use in this situation. Instead, you have to use RUNAS.EXE, which is a command-line executable program that is shipped with Windows.

So let’s start off by creating a shortcut – I’ll create one for the 2xExplorer program in the Quick Launch toolbar.

2xExplorer is a third-party, Explorer-like program which I find very useful when I need to perform administrative tasks operating as limited user – the opposite of what’s being described in this post.

In the picture at the left, I’ve created the shortcut (the yellow folder icon to the right of the Start menu), and I’ve right-clicked this icon and chosen the Properties menu item.

You can see that the Target is 2xExplorer.exe living in Program Files. Add in front of this the following:

%windir%\system32\runas.exe /user:test


The full path and filename to the runas executable is in black, whilst the user we want to run as is in blue – in this case, I have a user with a name of test.


Though, one side effect of changing the Target executable is that the icon gets stomped on. So you have to remember to customise the icon used by the shortcut – click the Change Icon button at the bottom of this dialog.

In this case, I point back to the original executable.


For runas to work, though, this user (test) must have a password set, AND the Secondary Logon service must running.


When all is working, you should see a command prompt window asking you to enter the password for the particular user account.

Remember, the user account must have a password set. Additionally the user must have logged into their Desktop at least once from the main login screen. ie There must be a folder for the user in the Documents and Settings folder.

One final thing. Because of security restrictions, certain user interface behaviours are specifically prohibited by the Windows Shell. For example, dragging and dropping from a program running as a lower privileged user onto a higher privileged program or desktop simply does nothing. This can be annoying, if your aware of it, and is downright infuriating when your not.

Posted in Computers and Internet | Comments Off on Using RUNAS.EXE to run as a limited user